![Untitled design (24)-1.png]](https://help.zenventory.com/hs-fs/hubfs/Logos/Untitled%20design%20(24)-1.png?width=60&height=60&name=Untitled%20design%20(24)-1.png)
What this does
The Admin importer bulk imports data from a CSV file at Admin > System > Import Data. The file can be one you made yourself or one exported from another system. Unlike the Basic Importer, it lets you map your file's columns to Zenventory fields, so your headers don't have to match a sample file. After the import runs, you can review the data and then complete it or undo it.
For other ways to import, see the Basic Importer article.
Before you start
- Roles: your user needs both the Admin and Importer roles.
- To set stock counts with Quantity Action = UPDATE in an Items import, you also need the Approver role.
- SecureKey: a SecureKey must be set on your user profile. See Create and Manage Users.
- Clients can't use this importer. Client users can't be given the Admin role, so they can't use the Admin importer or its mapping. Client users should use the Basic Importer instead.
- CSV file: save your file as .CSV, with column headers in the first row. The headers are what you match to Zenventory fields during mapping. For example, a "SKU" header sits above a column of SKUs, and a "Description" header sits above the item descriptions.
- Test first: try a small file of 2 or 3 rows before importing everything. Failed rows aren't reported, so a small test shows problems early.
What you can import
Each import type has its own tab on the Import Data Page.
Warehouse Locations and Inventory Quantities don't have their own tabs. Both are imported through the Items tab.
Steps
The import runs through a row of round step buttons at the top of the tab. Hover over a button to see its name.
Upload your file
1) Go to Admin → System → Import Data.
2) Select the tab for your import type.
.png?width=670&height=109&name=TEST%20(8).png)
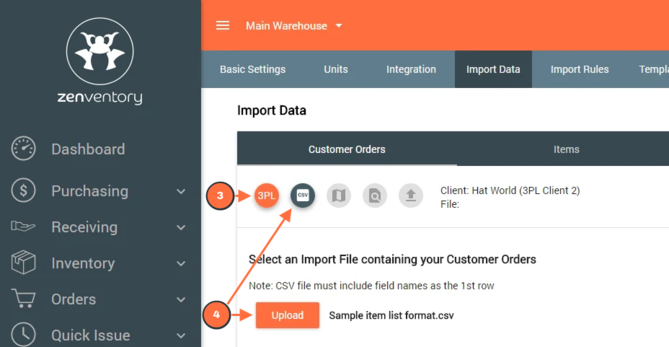
3) If you use 3PL features, click the 3PL button and select the Client. Each import runs for one client.
4) Click the CSV button, then click Upload and choose your file.
5) Review the file preview and click Accept the File.
Map your fields
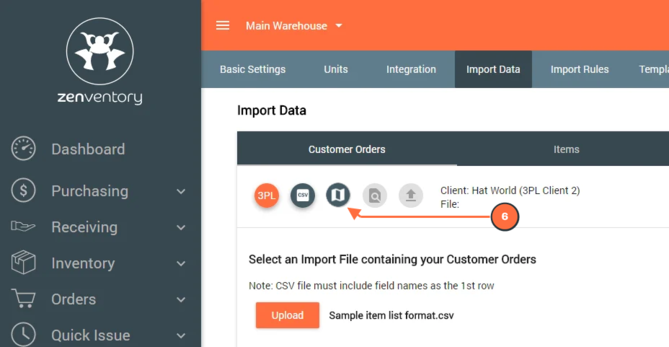
6) Click the Mapping button, then click Create a new Import Map. To reuse a saved map, skip to step 9.
7) Match each Zenventory field to the matching column header in your file. Required fields are marked with an asterisk (*). For more on mapping, see:
8) Keep the suggested map name or enter your own, then click Save Map.
.png?width=670&height=356&name=TEST%20(12).png)
9) Click the check mark next to the map you want to use to select it.
Preview and start the import
10) Click the Preview button. Use the arrows to move through the records and check that each column landed in the right field.
11) Click the check mark to accept the data as shown.
12) Click the Green Up Arrow icon button. The import starts immediately.
Complete or undo the import
13) When the import finishes, you’ll see “Physical File import is complete. What would you like to do next?”
14) Review the imported data. See How to verify it worked below.
15) Choose one:
- Complete Import: keeps the imported data. Once you click it, the import can’t be undone.
- Undo Import: removes the records this import created. It doesn’t reverse changes to existing records or stock counts set with UPDATE.
- Allocate Inventory for Imported Orders: Customer Order imports only.
Some imports can’t be undone.
Check these files carefully before you import them!
- Shipment imports have no Undo Import option.
- Undo Import doesn’t reverse Bill of Material imports.
How to verify it worked
- Check your data before you click Complete Import, while you can still undo it.
- Rows that fail are skipped without a message, so check that every row in your file was imported.
- To find where each type of record shows up, see the article for your import type below.
- If something is wrong, click Undo Import, fix the file, and import it again.
Common issues
"You must have importer privileges and a SecureKey to use this page."
Your user needs the Importer role and a SecureKey, as well as the Admin role. See Create and Manage Users
"Import file has no Columns"
Make sure the first row of your file contains column headers and that the file is saved as .CSV.
A saved map is flagged as invalid for your file
The map refers to column headers that aren't in this file. Edit the map or create a new one.
Some rows didn't import
Zenventory doesn't show which rows failed or why. Compare your file with the imported records, and check the missing rows against the article for your import type. Then click Undo Import, fix the file, and import it again.