Create and Manage Users
Create a New User
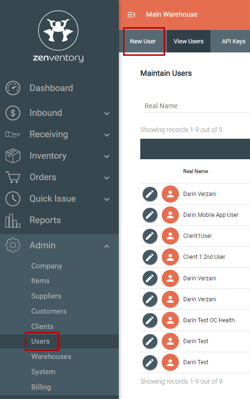
- Navigate to Admin>Users and click "New User".

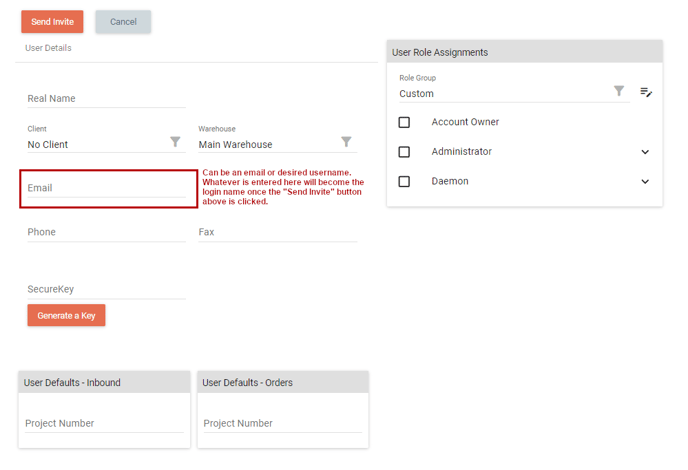
- Complete all required fields
- Full name
- Select Warehouse (Default is selected)
- Enter a log in name and Password. Confirm password. The user will be prompted to create their own password upon their first login, as long as this setting is selected under the System>Admin setup page.
- Enter user’s email OR desired username. You have the option of providing the user's email and that will be their username. During step #3 below, they will receive an email with a link to activate their user and set their own password. If you prefer to set a desired username, instead of email, then you would put that username in this "email" field.
- If you create a user without an email, the account will be created but initially will be disabled as the email link is what verifies and enables the account. To enable, simply go back into the account by clicking the pencil icon next to the left of their name
 > then unchecking the "disabled" box. Then hit save at the top.
- If you create a user without an email, the account will be created but initially will be disabled as the email link is what verifies and enables the account. To enable, simply go back into the account by clicking the pencil icon next to the left of their name
- Select the Roles the user will need/have in Zenventory (on the right) ** Roles determine the level of access and permissions user will have. Any amount of check boxes may be selected, the higher tiers will grant the access of their child tiers. Individual child tiers can also be checked or unchecked. Click these links for more detailed information about user roles/permission and user role groups.

3. Hit the "Send Invite" button once complete. This will save the new user. If you used an email as the username, then an activation email is sent to the new user. If you did not use an email and set a desired username instead, you can now click the pencil icon to the left of the user to set a password and uncheck the "disabled" box to enable the user for access.
Edit an Existing User
- Navigate to Admin>Users and click the pencil
 icon to the left of the desired user.
 - Once done editing the desired information, click the "Save" button
Bulk Editing Users
To bulk Edit users, select the check box at the end of the user's you wish to edit. Then go to Actions > Manage User Restrictions. NOTE - This action isn't available when the selected users don't all have the same Client. Bulk editing needs to be done on a per-client basis.

From here, you will get the following popup with 3 options:
- Restrict Customers - if enabled, user can only create and view Customer Orders for their associated customers. If that is none, they will be unable to view/edit ANY Customer Orders.
- Restrict Suppliers - if enabled, user can create, view & receive Purchase Orders only for their associated suppliers. If that is none, they will be unable to view/edit ANY Purchase Orders.
- Restrict Categories - if enabled, user can only use the Items in their associated Category. If that is none, they will be unable to select any Items.
- Restrict Warehouses - if enabled, user only has interactions available with their assigned warehouse or warehouse group. Must have at least 1 warehouse assigned.
- Restrict Clients - if enabled, user can only view and interact with data pertaining to the client's they are restricted to. Must have at least 1 client assigned.
.png?width=545&height=557&name=Screenshot%20(121).png)
A warning may pop up warning of overwriting previous values when making changes. Please ensure that the changes are correct before proceeding.

Available User Datafields
- Full Name
- Login Name - set in step "d" above.
- Phone
- Fax
- Client - for Unlimited level subscription accounts only
- Warehouse - user specific warehouse assignment
- SecureKey - for use with the BETA REST API, and mobile App. This will generate automatically for new users.
- User Defaults for Purchasing/Orders - allow you to set a project number specific to this user when creating new Purchase and Customer Orders
- Restrictions - assign the user to only specific suppliers, customers, item categories, warehouses, or clients.
Disable/Delete a User
Disabled - Checking the Disabled box will disallow login access to the system.
Delete - This will delete the user entirely from the system.
![Untitled design (24)-1.png]](https://help.zenventory.com/hs-fs/hubfs/Logos/Untitled%20design%20(24)-1.png?width=60&height=60&name=Untitled%20design%20(24)-1.png)