![Untitled design (24)-1.png]](https://help.zenventory.com/hs-fs/hubfs/Logos/Untitled%20design%20(24)-1.png?width=60&height=60&name=Untitled%20design%20(24)-1.png)
What this does
The Basic Importer uploads a CSV file straight from a Page, using the Import button in the Page Actions. It works on the List Inventory, Admin > Items, Open Orders, Purchasing All Open, and Warehouse Transfer Pages. It creates or updates records in one step, with no mapping. Use it when your file uses the headers from the sample file.
For other ways to import for Admin Users, see How to Import Data with the Admin Importer .
Before you start
- Role: your user needs the Importer role. Without it, the Import button doesn't appear in the Page Actions.
- To set stock counts with Quantity Action = UPDATE, you also need the Approver role.
- Admin > Items: this Page also needs the Admin, Admin Customer, or Item Admin Add role.
- Client users can only have Admin Customer.
- If you don't have one of these roles, use the Import button on Inventory > List Inventory instead.
- SecureKey: a SecureKey must be set on your user profile. It's the same key used for API access, and the import tools use it behind the scenes. An administrator can set it for you. See Create and Manage Users.
- Active Warehouse: check the Active Warehouse at the top left of the screen before importing. Items imported by client users always go into it.
- Sample file: download the sample file from the Import window (see Step 4). Your column headers must match it exactly, so do not change them. To see which columns are required for your task, open the fields article for your import type in the table below.
- Test first: try a small file of 2 or 3 rows before importing everything. Failed rows aren't reported, so a small test shows problems early.
Where to find the Import button
The Import button is in the Page Actions, at the top right of the Page.
Steps
1) Go to the page for the data you’re importing (see the table above).
2) In Page Actions, click Import to open the Basic Importer. The Import from a CSV file window opens.
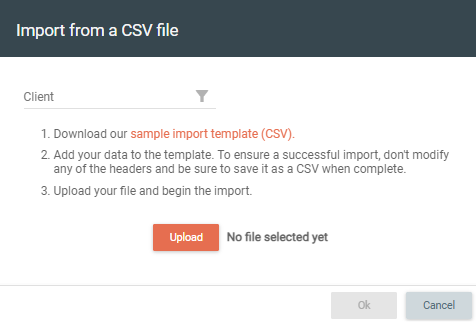
3) If you see a client list, select the client. Ok stays disabled until you choose one.
4) Click sample import template (CSV) to download the sample file.
5) Open the sample file in Excel or Google Sheets.
6) Add your data under the existing headers.
- Don’t rename or remove any headers.
- You can delete columns you don’t need.
7) Save the file as .CSV.
8) Click Upload and choose your file.
9) Wait for Processing... to finish. The file name and the number of lines found appear under the button.
10) Click Ok. The import runs and completes automatically.
This import can’t be undone. It completes as soon as you click Ok. Check your file before uploading.
How to verify it worked
After the import, a "CSV import completed." message appears and the Grid reloads.
Rows that fail are skipped without a message, so check that every row in your file was imported.
Items that add stock
- Go to Receiving > Search. The Search for Receipts Page opens.
- In the PO Number Search Filter, enter IMPORT. The search matches part of the number, so this finds every import receipt.
- Check that For Warehouse is set to the warehouse you imported into. It defaults to the Active Warehouse.
- Optionally, use Received From, Received To, or SKU to narrow the results.
- Click Search.
- Open the receipt. Each row that added stock appears as a line with its quantity and location.
- Each warehouse gets one receipt per import, with a PO number like
IMPORT_[date and time]. - Import receipts are accepted automatically, so they also show when Status is set to Accepted.
- Each warehouse gets one receipt per import, with a PO number like
Items that don't add stock
Check the Grid on Admin > Items.
Customer Orders
- Go to Orders > Open Orders.
- Check the Order Source Column. Imported orders show the Order Source from your file, or CSV Import if that column was blank.
- Compare the orders in the Grid with the order numbers in your file. Use the Order Number Search Filter to look up a specific order.
Purchase Orders
- Go to Purchasing > All Open.
- Use the PO Number Search Filter to look up each PO number from your file.
Transfer Orders
- Go to Inventory > Warehouse Transfer.
- Check the All Open View, or My Drafts for orders imported as drafts.
- To find a specific transfer order, use the Search View.
If rows are missing, fix them in a new file that contains only those rows, and import that file.
Things to know
Headers and mapping
- Header names must match the sample exactly, including spaces and capitalization.
- Headers come from your company's field names. If fields were renamed in the Lexicon, the headers change too, so download a fresh sample instead of reusing an old one.
- A column with any other header is ignored with no warning.
- Saved import maps aren't used by the Basic Importer.
Orders
- New customer orders are allocated during the import.
- Transfer Orders: each import is for one client. The window shows a reminder about this.
Items
- Client users importing items:
- Warehouse, location, and default location columns are ignored. Items go into the Active Warehouse.
- Stock quantities can't be imported.
- Client users can't import stock quantities or locations.
Field rule articles for each import type
- Items Import Field References and Situation How Tos
- Customer Orders Import Field References and Situation How Tos
- Purchase Orders Import Field References and Situation How Tos
- Transfer Orders Import Field References and Situation How Tos
Common issues
There's no Import button in the Page Actions
Your user needs the Importer role. Ask your administrator to add it.
You can't open Admin > Items
Use the Import button on Inventory > List Inventory instead. It imports items the same way and only needs the Importer role.
Ok is greyed out
Select a client, then upload a file. Wait for Processing... to finish before clicking Ok.
Items went into the wrong warehouse
Check the Active Warehouse before importing. For client users, items always go into the Active Warehouse. Any Warehouse column in the file is ignored.
Some columns didn't import
Check that those headers match the sample file exactly, including spaces and capitalization.
The import finished but some or all records are missing
- The Basic Importer doesn't report failed rows.
- Check that your headers match the sample file.
- Check the missing rows against the fields article for your import type.
- If nothing imported at all, check that your user has a SecureKey, then reach out to support.