![Untitled design (24)-1.png]](https://help.zenventory.com/hs-fs/hubfs/Logos/Untitled%20design%20(24)-1.png?width=60&height=60&name=Untitled%20design%20(24)-1.png)
What this covers
This article explains which columns to include in a Bill of Material import for common tasks, which fields are required, and what every Bill of Material import field does. Use it to add, change, or remove the components that make up your kits and assemblies. The Bill of Material import is only available in the [Admin importer].
Field names below are the Zenventory defaults. If your company renamed fields in the Lexicon, your screens and sample file show your names instead.
Prior To Import
- Both SKUs must already exist (Components and Kit/Asssembly)— unlike the items importer, the BOM importer will not create items. If either SKU is not found the import fails with an error.
- Blank quantity = delete — this is an easy one to accidentally trigger. If a customer re-exports and reimports a file with any blank quantity cells, those components will be removed from the BOM silently.
- Assemblies vs Kits — if the master item is flagged as an Assembly rather than a Kit, the BOM is stored differently internally. The import handles both, but customers should make sure their master item type is set correctly before importing.
How do I set up the file?
Multiple components per master item — use the same Master Item SKU on multiple rows, each with a different Component Item SKU and Quantity to build up a full BOM.
Required Fields for the BOM Import:
Your BOM upload file must include these three columns:
- Master Item SKU — The SKU of the kit you are defining.
- Component Item SKU — The SKU of the item(s) that will be included as a component(s).
- Quantity — The number of units of the component used in one unit of the kit.
Each row represents one component. If a kit has multiple components, include multiple rows with the same Master Item SKU. Each component that makes up a kit will need its own line in the BOM import file.
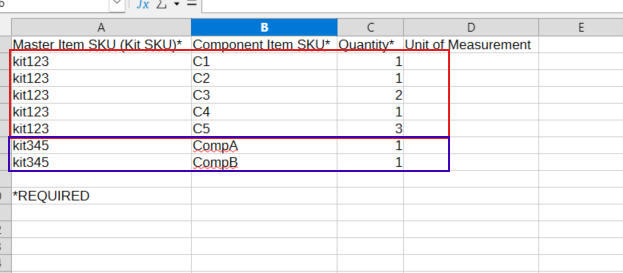
In the example above, there are two kits represented: KIT123 and KIT345.
KIT123 is made up of the following components:
- C1 with a quantity of 1
- C2 with a quantity of 1
- C3 with a quantity of 2
- C4 with a quantity of 1
- C5 with a quantity of 13
KIT345 is made up of the following components:
- CompA with a quantity of 1
- CompB with a quantity of 1
Each component for each kit would appear on its own line in the BOM import file, using the appropriate Master Item SKU (KIT123 or K345)
Mapping reference table
This table lists every field on the Bill of Material import mapping screen, in the same order and under the same section heading (Item). Use it to decide which of your file's columns to map to each field, and to check that your data is in the right format.
For each field, the table shows:
- What to map this to for Bill of Material: what the field does on the kit or assembly.
- When is this field required?: whether the field is always needed or optional.
- Format: the type of value the field accepts, such as text or number, and its character limit.
Field names are the Zenventory defaults. If your company renamed fields in the Lexicon, your mapping screen shows your names instead.
Situation how-tos
How the import handles kits and assemblies
Kit or Assembly?
Set the master item as a Kit or an Assembly before you import.
- If the master item isn't set as either one yet, the import sets it as a Kit. To build an assembly, set the item as an Assembly first.
- Kits and assemblies handle a 0 quantity differently. On a Kit, 0 removes the component. On an Assembly, 0 is saved as the quantity.
Will my file replace the whole kit or assembly?
No. The import only changes the components that are in your file.
- A component that isn't on the item yet is added.
- A component that's already on the item has its quantity updated.
- Components that aren't in your file are kept.
Can I undo a Bill of Material import?
No. Undo Import doesn't reverse Bill of Material imports. Test with a small file first, and check the results before you import the full file.