![Untitled design (24)-1.png]](https://help.zenventory.com/hs-fs/hubfs/Logos/Untitled%20design%20(24)-1.png?width=60&height=60&name=Untitled%20design%20(24)-1.png)
What this does
Walks a picker through one Pick to Tote trip in the Zenventory mobile app: claiming a cart, loading totes, picking each item into its tote, and bringing the cart back for packing.
Before you start
- Your carts and totes are set up and labeled. See: How to set up carts and totes.
- You're signed in to the Zenventory mobile app v3.2. with the correct warehouse selected.
- Your device is online. Pick to Tote can't be used offline.
- You have an empty cart and enough empty totes nearby.
Steps
Part 1 of 5: Claim a cart
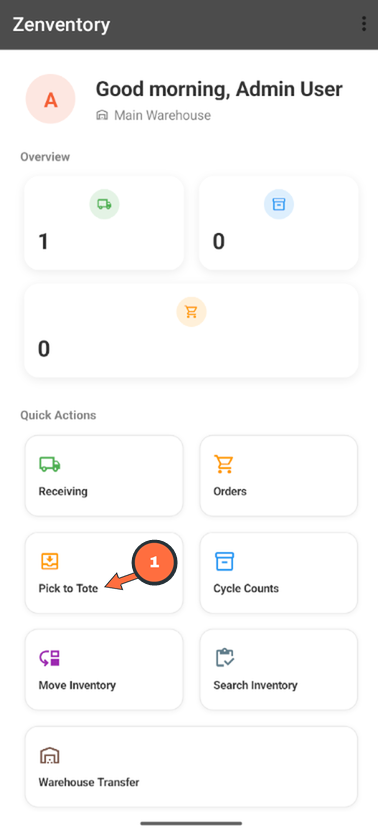
1) On the Dashboard, tap Pick to Tote.
2) Scan the cart's barcode, or type the cart number into Scan or enter cart number.
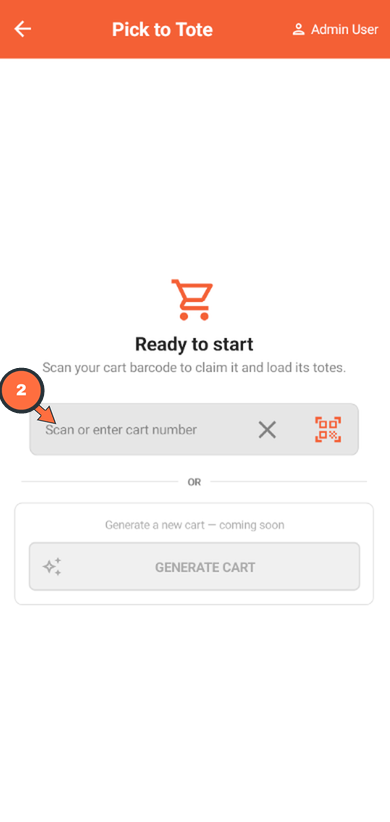
The cart is now assigned to you, and the Load Totes screen opens.
Part 2 of 5: Load totes
The screen shows a drawing of your cart, with each level labeled (L1, L2, and so on). For how levels are numbered:
1) Tap the level you're loading. The field label changes to Scanning onto level and the level number. Scanning starts on Level 1.
Important: The app doesn't move to the next level on its own, even when a shelf is full. It keeps adding totes to the selected level until you tap a different one.
2) Set an empty tote on that shelf of the cart, then scan the tote's barcode with the app, or type the tote into Scan or enter tote. On screen, totes fill in from the left, so put each tote on the shelf in that same order.
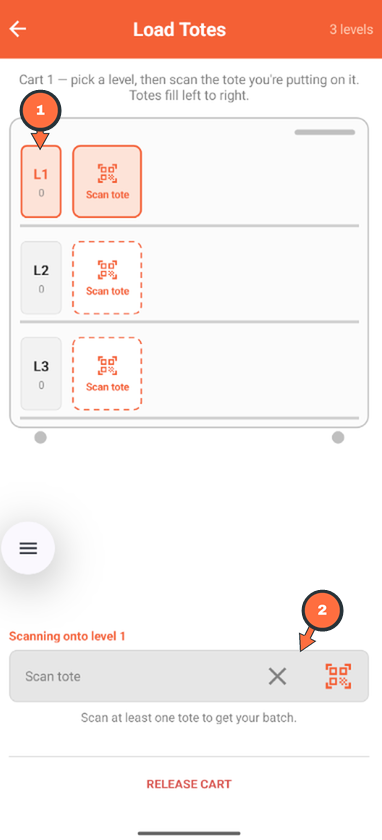
The Load Totes screen before any totes are scanned. Each level shows a count of 0.
3) Repeat for each tote you're putting on that shelf: tote on the shelf, then scan.
4) In the app, tap the next level, then load and scan the totes for that shelf. Repeat until every tote is on the cart and scanned.
5) When the cart is loaded, tap Done loading (number of totes) — Get batch. The button only appears once you've scanned at least one tote.
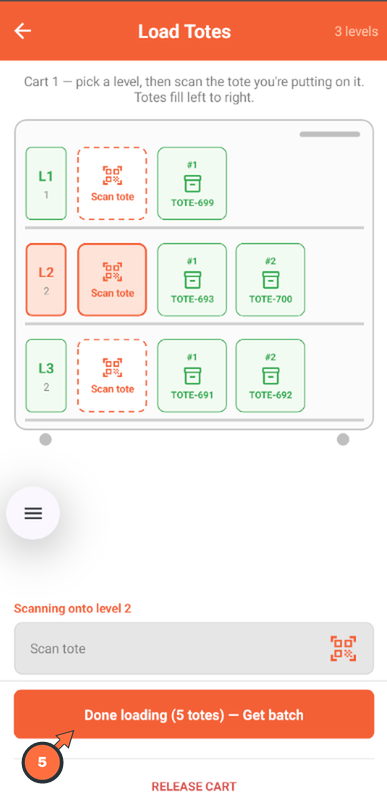
6) A confirmation window lists the totes on each level. Check it against the cart in front of you, then tap Load.
Important: After you tap Load, you can't change the totes on the cart for this trip.
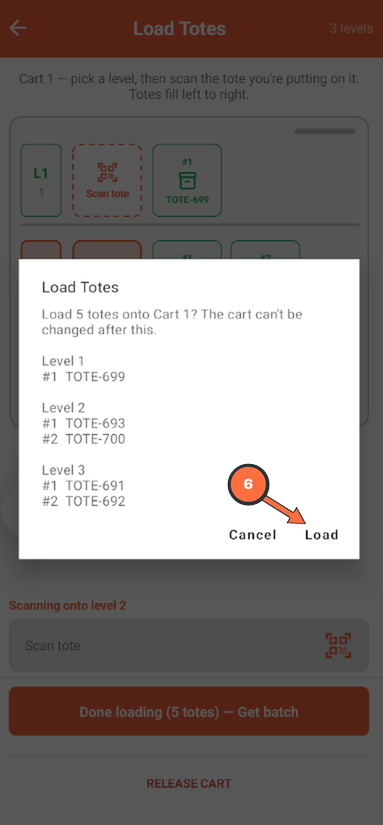
Zenventory assigns orders to your totes. Some totes may not get an order.
Part 3 of 5: Start the batch
The screen shows your cart with the number of Orders, Picks, and Locations, and the Pick Route with each stop.
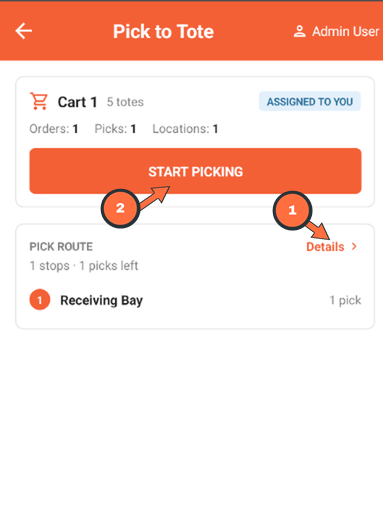
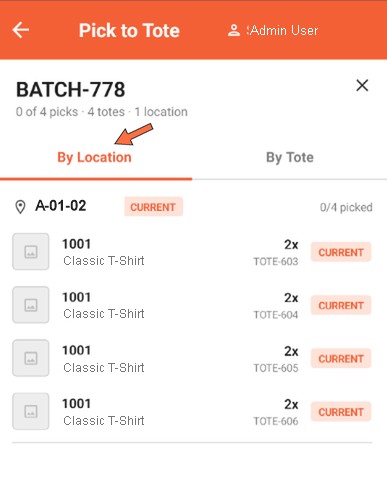
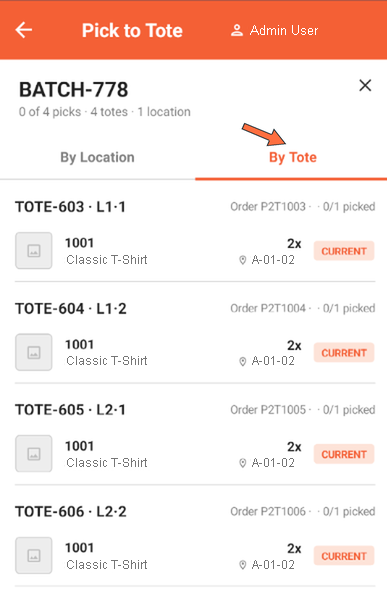
1) Optional: tap Details to see what's in the batch. The window opens on By Location and has two views:
- By Location: every item grouped under the location you'll pick it from, with the tote each one goes in. This matches the order you'll walk the route.
- By Tote: every item grouped under its tote, with the tote's level and position (for example L1·1) and the order it's filling.
|
|
Both views show the same picks, and CURRENT marks the stop you're on. Tap the X to close the window.
2) Tap Start Picking.
Part 4 of 5: Pick each item
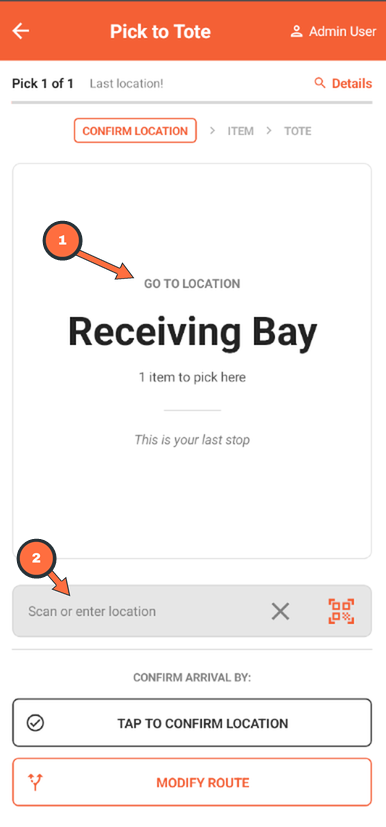
Each pick has three steps, shown at the top of the screen: Confirm Location, Item, and Tote.
1) Walk to the location shown in the app under GO TO LOCATION. Under the name, the app tells you how many items to pick there, and says so when it's your last stop.
2) At the location, scan its barcode with the app, or type the location into the field. If there's no barcode and no label to read, tap Tap to Confirm Location instead.
3) Take the item shown on screen off the shelf and scan its barcode, or type the item into the field. If the item has no barcode and nothing to type, tap Manual Confirmation instead.
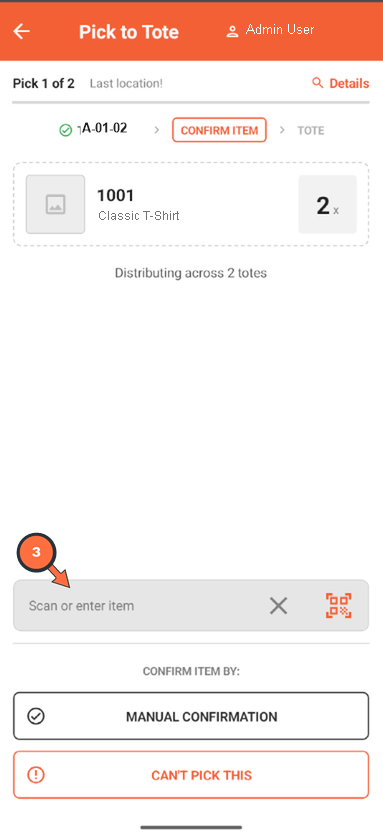
Picking the same item for more than one order: When several orders at this stop need the same item, the app asks for them together. The card shows the total to pick, for example 2x, and the line under it reads “Distributing across 2 totes”.
Pick all of them at once, then the app takes you through placing them, one tote at a time, so each order gets its share.
4) If the item has serial numbers, the app adds a SCAN SERIALS button at the bottom of the tote step. Tap it before you scan the tote. The button carries a count, for example "SCAN SERIALS (0/1)", so you know how many units are left. In the window that opens:
- Scan or type a serial, then tap ADD. Repeat for each unit. The window keeps a running count, for example "0 of 1 captured".
- Tap Done when every serial is captured. The app won't let you past this until they all are.
- Tap Cancel to back out. Nothing is captured, and you stay on the same pick.
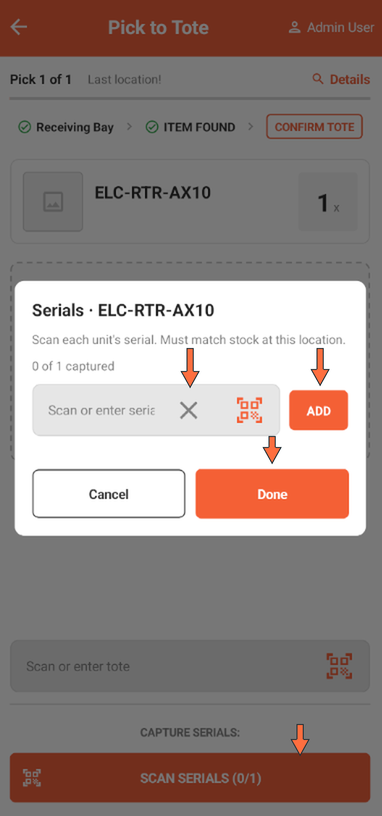
Each serial has to belong to stock at this location, so pull the serials off the units you're actually picking.
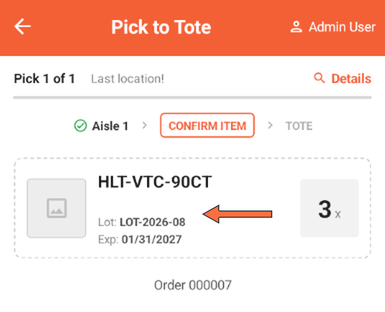
Lot and expiration items:
The card shows Lot and Exp under the item. Pick the units that match. The lot was chosen when the order was allocated, so you can’t change it here. If nothing at the location matches, use Can’t Pick This.
5) Put the item in the tote the app shows under Place in Tote. The screen gives the tote ID and where that tote sits on the cart, for example "Level 1 · slot 1", so you know which one to reach for.
6) Scan that tote's barcode to confirm the item went in it, or type the tote into the field.
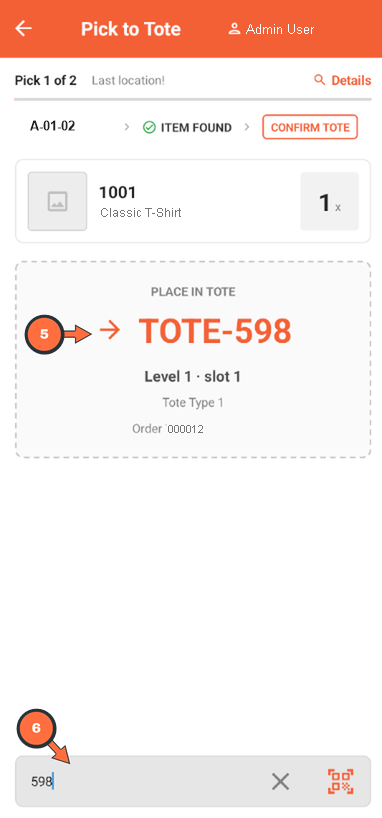
The app moves on to the next pick. Repeat until the batch is complete.
How the app answers each scan:
Every scan gets a full-screen flash before the app moves on.
- Green with a confirmation: the scan matched. The message names what you confirmed, for example "Location Receiving Bay confirmed", "SKU 1001 confirmed", or "TOTE-603 confirmed". The flash clears on its own and the app goes to the next step. You don't tap anything.
- Red with "Mismatch": the scan didn't match. The flash shows what you scanned, then the app puts you back on the same step with a line under the field reading "Scanned (what you scanned). Expected (what it wanted)." Scan the right one. Nothing to dismiss, and nothing is recorded against the wrong item, location, or tote.
If something goes wrong:
When you can't pick an item:
Use CAN'T PICK THIS when the stock isn't there, isn't usable, or you can't get all of it. The button sits at the bottom of the item step and the tote step.
1) Tap CAN'T PICK THIS.
2) Tap Reason and choose the one that fits. It starts on Location empty.
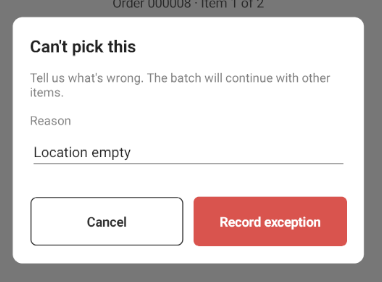
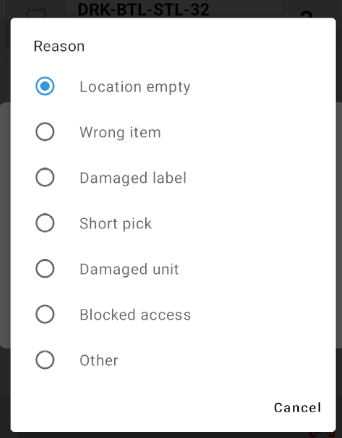
3) Tap Record exception. Tap Cancel instead to go back and try the pick again.
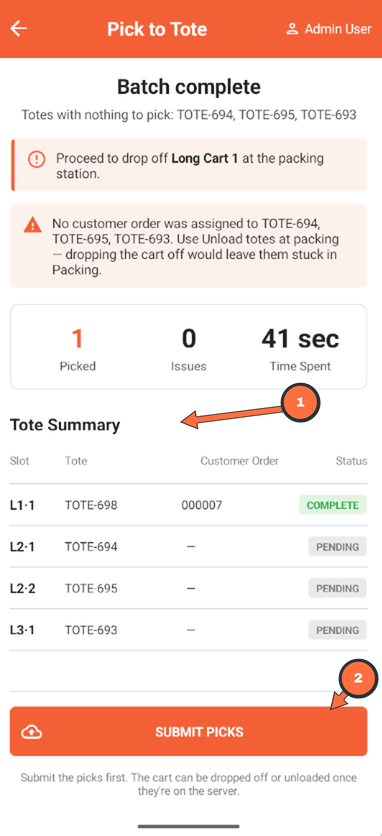
The app moves on to the next pick. What you flagged shows up at the end of the batch, on the Batch complete screen: the line is counted under Issues with the reason you chose, and the tote it belonged to shows INCOMPLETE.
What Zenventory sees: only the units you actually picked. The shortage shows on the order, which keeps its allocation and stays short until someone deals with it, but the reason you chose stays on your device. Tell your supervisor when a location needs a recount or a restock.
Part 5 of 5: Submit picks and finish at the packing station
1) On the Batch complete screen, check the Tote Summary against what's on the cart. Each tote shows its slot, the order it filled, and a status of COMPLETE or PENDING. A tote with no order shows a dash.
2) Tap Submit Picks.
3) Walk the cart to the packing station.
4) At the station, tap Finish at Packing Station.
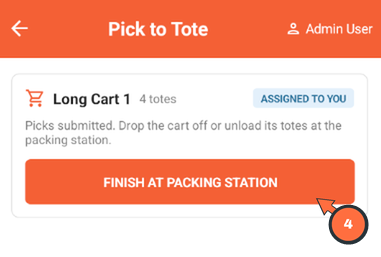
5) Choose what to do with the cart:
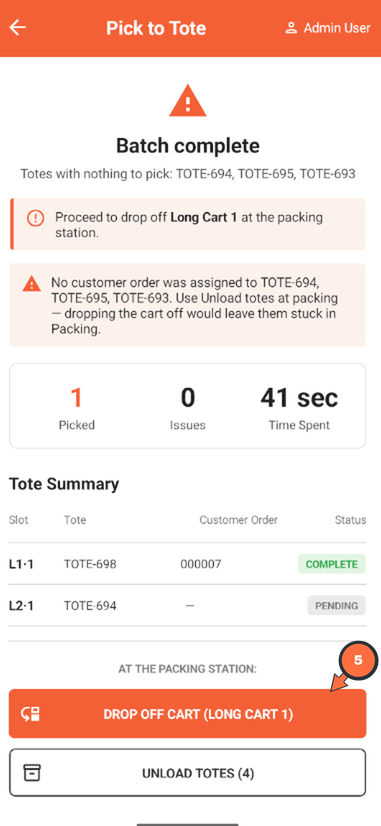
- DROP OFF CART (number of totes): leave the loaded cart at the packing station. The cart and its totes stay tied to their orders until the packer finishes with them.
- UNLOAD TOTES (number of totes): take the totes off the cart and leave them at the station. The cart is freed up for the next trip.
You can only do this after the picks are submitted. Until then the app says to submit the picks first.
How to verify it worked
- The app no longer shows the cart as assigned to you.
- On the web, Admin → Carts & Totes → Manage Carts shows the cart as Packing (if dropped off) or Available (if unloaded).
- On the Manage Totes tab, totes with picked orders show Packing.
- At the Pack or Ship screen, scanning a tote's barcode opens its order.
Common issues
Problem: "Cart in use by another user" Fix: Someone else has claimed this cart. Choose a different cart, or ask a manager to check the cart on the Manage Carts tab.
Problem: "You already have a Cart claimed" Fix: You can only claim one cart at a time. Finish or release your current cart first.
Problem: "Cart is not Available. Current status is Packing." Fix: The cart is still waiting at the packing station. Use a different cart until its orders are packed or shipped.
Related articles