![Untitled design (24)-1.png]](https://help.zenventory.com/hs-fs/hubfs/Logos/Untitled%20design%20(24)-1.png?width=60&height=60&name=Untitled%20design%20(24)-1.png)
In Zenventory, you have the ability to create custom tags and attach them to Customer Orders. Each tag can have its own color, custom icon, tag name, and tag notes. The use of tagging allows you to be able to identify orders by certain information, filter for those orders, use tags in conjunction with automation rules, etc. There is no limit to the number of tags you can create and use in Zenventory.
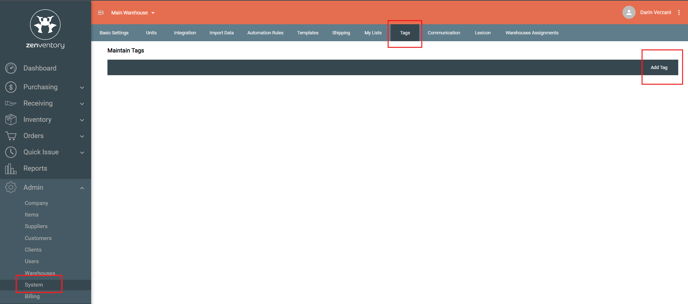
How to Create/Edit Tags
- Navigate to Admin->System->Tags
- Select the "Add Tag" option on the right side of the page.
- Input a Tag Name, choose an icon, choose a color, input a tag note, toggle the tag to Active.
- The default icon is a "label" but you can choose from a vast list of icons by deleting the "label" input in the icon selection field.
- A preview of your tag will show on the bottom of the information input modal.
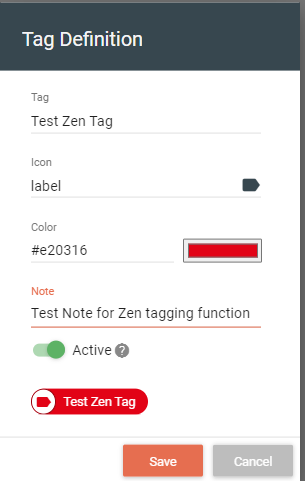
- Hit save once complete.
- Once a tag has been created, you can edit or delete it from this same page.
- Use the pencil icon selection to make edits.
- Use the trash bin icon with an x in it to delete.
How to Apply Tags to Orders Manually
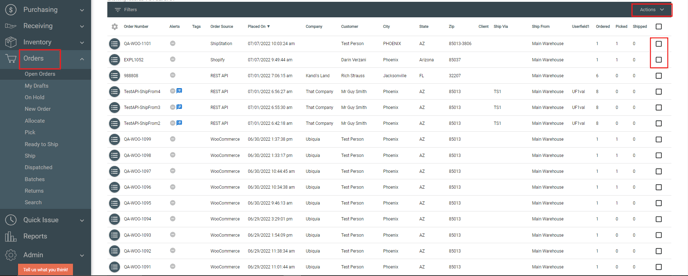
You can apply and manage order tagging manually from the Orders section pages using the action menu on the respective page you are working on.
- Select an order or orders you would like to apply a specific tag to using the square boxes on the right side of the screen.
- Use the actions menu to select "Manage Tags."
- A Select Tags modal will pop up. There is a search bar to find a specific tag if you need it. Select the tag (s) you wish to apply to the chosen orders by selecting the square checkbox to the left of the tag name. Hit "Save Tags"' once complete.
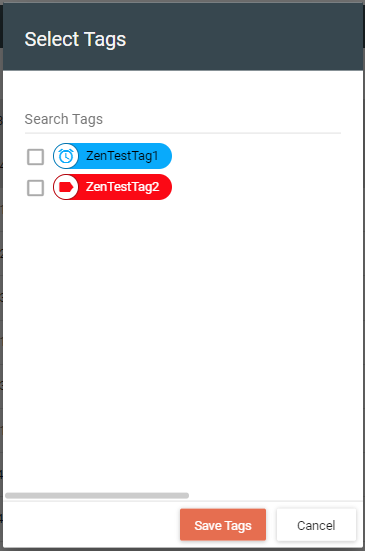
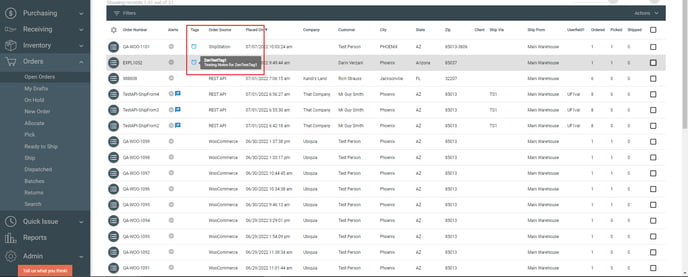
- Now, you will see the tags applied to orders in the "Tags" column of the interface. If you hover your mouse over a specific tag, it will show you the tag note for that tag.
How to Apply Tags to Orders via Automation Rules:
This section will show you how to create a basic automation rule to apply a tag to an order upon import into Zenventory, or manual internal order creation. For more detail on automation rules, check out this help article: https://help.zenventory.com/create-and-manage-automation-rules
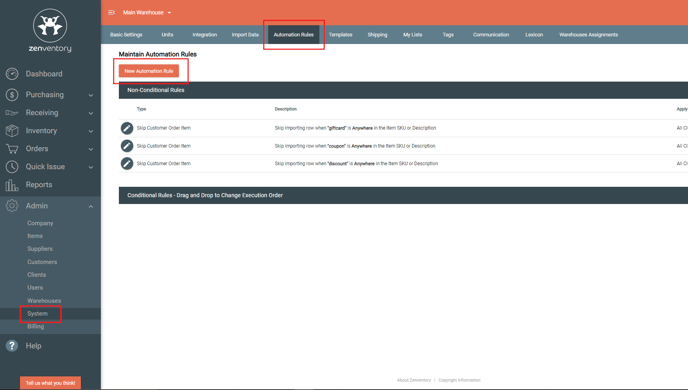
- Navigate to Admin>System>Automation Rules and select the orange "New Automation Rule" button.
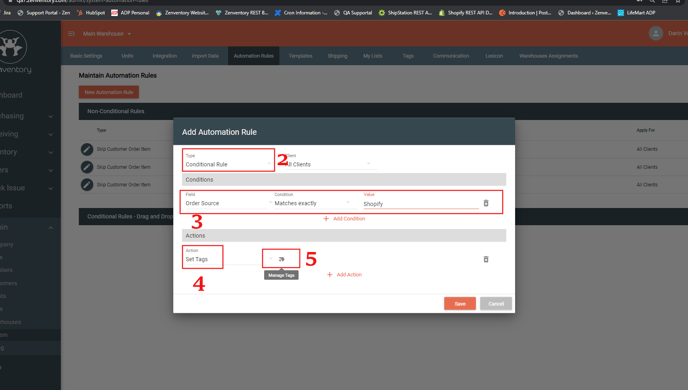
- Choose the "Conditional Rule" type.
- Choose the conditional criteria you will use to then apply a custom tag to orders.
- Choose the action "Set Tag".
- Select the "Manage Tags" icon to pull up the tag search modal and select which tag (s) you wish to apply in this automation rule. Once complete, hit the orange "Save" button.
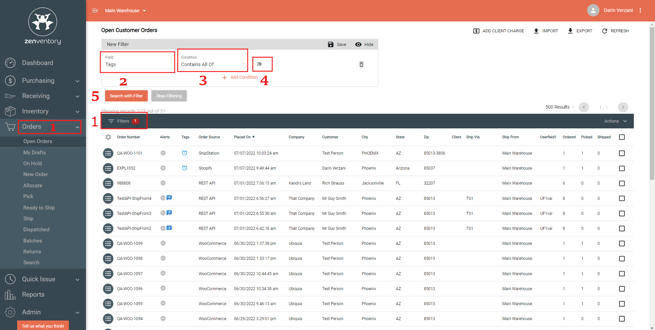
How to Filter Orders using Tags on the Orders Pages:
This will show you how to apply a filter using tags, for more detailed information on filters, please see this help article: https://help.zenventory.com/use-table-filters
- From any of the respective Orders pages, select the "Filter" text on the top left of the order grid.
- Choose Tags in the field dropdown menu
- Choose the condition with which you want to use tags to filter. There are 3 Options
- Contains All of
- Contains Any of
- Does Not Contain Any of
- Select the tag (s) you will be using in the filter.
- Hit "Search with Filter"" to apply the filter to your search.