![Untitled design (24)-1.png]](https://help.zenventory.com/hs-fs/hubfs/Logos/Untitled%20design%20(24)-1.png?width=60&height=60&name=Untitled%20design%20(24)-1.png)
Begin the video at 3:37, or jump to Chapter 2 for the portion covered in this article.
Before you start
This is Part 2 of the 3-part Shopify + Zenventory setup process. To ensure Zenventory can get orders and do inventory updates properly, every product being fulfilled by Zenventory needs the Zenventory app location as an available stock location.
You should have already completed Connect Shopify to Zenventory (Part 1 of 3): Install the App before continuing. Part 1 covers required product settings, SKU requirements, and the initial app installation steps that must be in place before assigning inventory to the Zenventory location.
For any order to flow into Zenventory, two conditions must occur in Shopify:
- The items on the order are assigned to the Zenventory fulfillment location.
- A fulfillment request is created for Zenventory.
This section ensures your products are stocked correctly so those two conditions can happen automatically.
Assign Products to the Zenventory Location
1. Export your current inventory
Before making changes, export your current inventory counts for all Shopify locations. Keep this as a backup in case you need to revert anything.
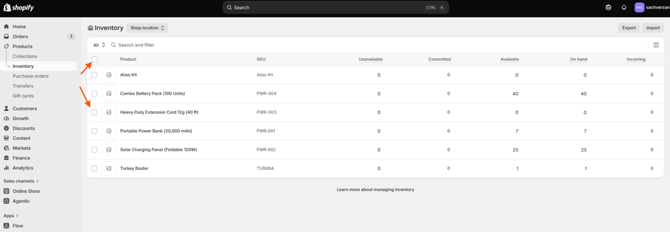
2. Open Shopify inventory
In Shopify admin, go to Products → Inventory. You can use this page to view and manage inventory across locations. Shopify guide: Understanding inventory management for multiple locations
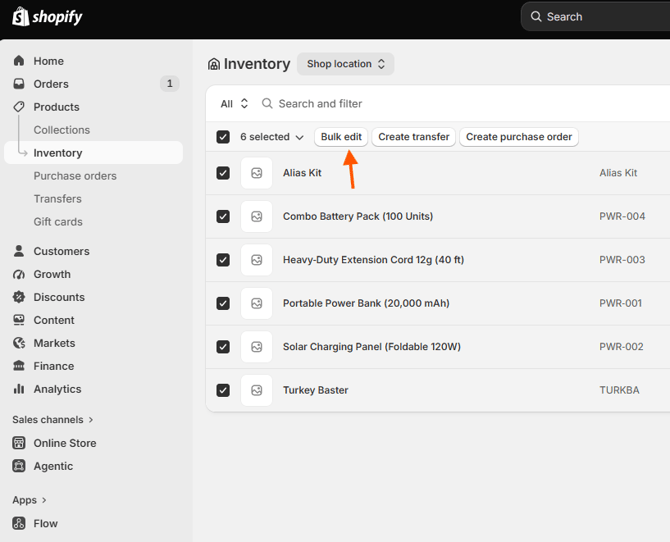
3. Open the bulk editor
Select the products or variants that Zenventory will fulfill, then click Bulk Edit or Edit variants. Shopify guide: Adjusting inventory quantities in bulk
4. Display the Zenventory location
Click Columns in the top-right corner and make sure the Zenventory location is selected.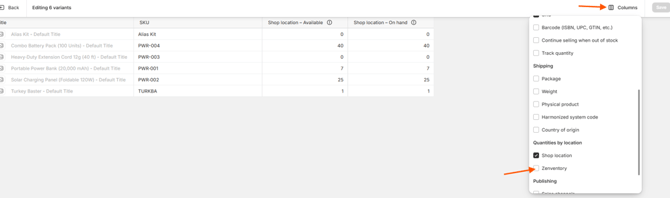
5. Make products available at Zenventory
For each product that Zenventory will fulfill:
- If Zenventory – Available shows “Not stocked”, click in the cell.
- Select the Available option, if that option is provided by the Zenventory integration.
- Save the changes.
Note that the Zenventory Inventory numbers will remain at 0 until get stock updates run.
This activates or assigns the product to the Zenventory location. Shopify explains that a product must be active at a location before it can be sold or fulfilled from that location. Shopify guide: Understanding inventory management for multiple locations

6. Continue to Part 3
With your products available at the Zenventory location, continue to Part 3: Set Up Shopify Flow to Send Orders to Zenventory to automate order routing and fulfillment requests.
Troubleshooting
Zenventory location isn't showing up in the Columns list?
You likely haven't completed Part 1 yet. The Zenventory location is created automatically when the app is installed and initialized, so it won't appear here until that step is done.
Quantity still shows 0 after marking a product Available?
This is expected right after saving. The count updates once Zenventory sends its next stock update, not immediately.
Product still shows "Not stocked" after saving the bulk edit?
The change may not have applied to every variant. Check each variant individually, since bulk edit can miss variants that weren't fully selected.