![Untitled design (24)-1.png]](https://help.zenventory.com/hs-fs/hubfs/Logos/Untitled%20design%20(24)-1.png?width=60&height=60&name=Untitled%20design%20(24)-1.png)
This article will walk you through installing the Zenventory App from the Shopify App Store. This method is required for all Shopify Basic Subscription tier plans.
Prerequisites:
- Before they can sync to Zenventory, all Shopify products must have a unique SKU assigned (including variants). If some of your products are missing a SKU in Shopify, you can add them easily using the Bulk Editor described in this article. Inventory synchronization will fail for any item missing a SKU in Shopify.
- All Shopify products must be marked as a physical product and the option to track inventory in Shopify must be enabled with Zenventory as an available stock location. Inventory synchronization will fail for any product where these two settings are disabled in Shopify.
- Requires the use of the free Shopify Flow app installed within your Shopify account.
Shopify Integration Functionality (updated 6/27/2023)
This can be a technical setup that requires quite a few settings adjustments in your Shopify account and an understanding of location priorities, shipping origin locations, and order routing with the free Shopify Flow app.
- Pulls items, their details (sales price, shipping weight, UPC, cost) and quantities from Shopify into Zenventory during initialization (unless a matching SKU already exists. If a matching SKU already exists in Zenventory, then the connection is made, but no data is downloaded from Shopify). Once the item has been downloaded/connected to Zenventory, then any changes made to the item details in Shopify will not automatically carry over to Zenventory.
- Pulls new fulfillment orders into Zenventory that have been (1) assigned to the Zenventory fulfillment app location within Shopify and (2) a fulfillment request has been created for Zenventory.
- Pushes updated inventory stock levels from Zenventory to Shopify for matching SKUs (if stock updates is enabled).
- Pushes order status update when completed, shipped, or canceled from Zenventory to Shopify. If a fulfillment order is cancelled, then the order will transition from In Progress to Unfulfilled status in Shopify.
- Pushes shipment data from Zenventory to Shopify
Update interval (maximums):
- All actions: 15 minutes
INSTALLING THE INTEGRATION
- Login to your Zenventory at app.zenventory.com in a browser tab. Stay logged in on this browser tab.
- Open a new browser tab and login to your Shopify Account.
- In your Shopify account go to Settings>Apps and Sales Channels and click the Shopify App Store button.

- Search the app store for "Zenventory" and click it in the search results.
- Click the install button.

- You'll be redirected to a new page. Click the install button.

- You'll then be on a Zenventory page that says "Installation Finished." Hit the "marketplace integrations" button.

- You are now redirected to the Admin>System>Integrations>Marketplaces page. Click on the Shopify integration that was just installed. It will be the one on the bottom of the list.
- Input a Shop Name, select the correct client (3PL accounts only) of your choosing, and adjust any other settings.
- Hit the "Save" button.
- Hit the "Initialize" button to finish the connection process.
ADDITIONAL SHOPIFY SETUP REQUIRED
- Now that the connection process has been completed, there are just a few more steps that need to be taken on the Shopify side of things to get this fully set up to be as hands free as possible. Always remember that in order for Zenventory to get orders, two things need to happen in order when an order is placed/created. (1) The items on the order get assigned to the Zenventory location for fulfillment and (2) a fulfillment request needs to be created for Zenventory.
- The next task is to make sure your products that you want Zenventory to fulfill are available to be stocked in the Zenventory location and removing stock from any other location you don't want to show inventory in. Zenventory will push stock updates into that Zenventory location.
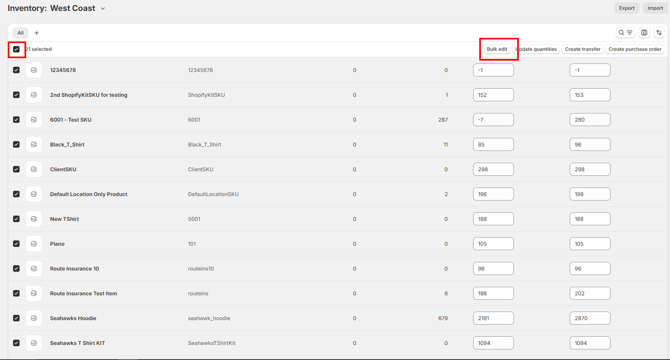
- This is done by navigating to Products > Inventory in Shopify. ***IT IS HIGHLY RECOMMENDED TO EXPORT YOUR INVENTORY COUNTS FOR EXISTING SHOPIFY LOCATIONS PRIOR TO PROCEEDING IN THE EVENT THAT YOU NEED TO REVERT***. Click the top checkbox on the left and then click "bulk edit".
- Click the "Columns" button in the top right and make sure the Zenventory location is selected for view.
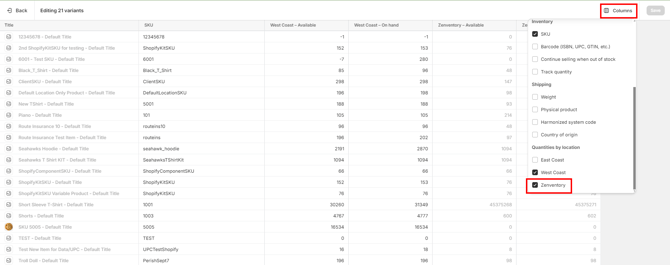
- If any item shows "not stocked" in the "Zenventory - Available" column then you need to change that by clicking into that cell and selecting the "Available" checkbox. If one of your existing Shopify locations contains the inventory numbers in Zenventory, then you'll want to remove those inventory numbers so you aren't showing more inventory than you actually have. Zenventory pushes the inventory numbers in that Zenventory location in Shopify.

- Once complete with updating your items to be stocked in the Zenventory location and making any inventory adjustments to other locations, hit the "Save" button in the top right to save your changes.
- The final task is to setup a workflow in the Shopify Flow app to (1) assign orders to Zenventory and (2) create the necessary fulfillment request so Zenventory can see those requests and automatically download orders. Go to Apps>Shopify Flow.

- Hit the "Create Workflow" button in the top right.

- The workflow you will create will have a "Trigger" = Order Ready to Fulfill, "Condition" = Location Name is not Equal to Zenventory. If Zenventory is not the location, then Action = "Move Fulfillment Order to Zenventory Location" and a final Action = "Submit Fulfillment Request". Otherwise, if Zenventory is the location, then Action = "Submit Fulfillment Request".

ASSIGNING EXISTING (before Zenventory Install) SHOPIFY ORDERS TO ZENVENTORY FOR FULFILLMENT
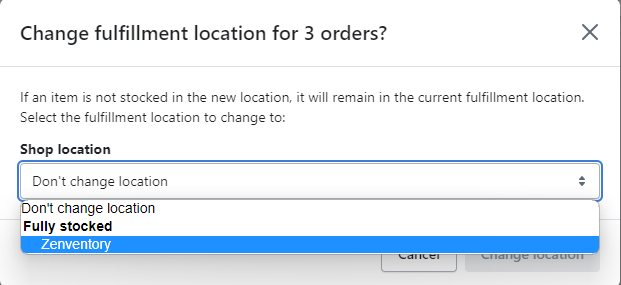
- Select any orders that need to be converted to have a fulfillment request and click the ellipsis (...) at the bottom of the page to expand the actions. After doing so, click Change Fulfillment Location.
- After doing so, you should see a new popup where you’ll want to select Zenventory from the dropdown and click change location.
- Your final step will be to keep those same orders checked and click the ellipsis button one more time at the bottom of the order grid. This time you’ll want to click Request Fulfillment.
- These new fulfillment orders will downloaded into Zenventory on our normal automatic order pull within the next 15 minutes, or you can manually pull them in by hitting the "Refresh" button on the Open Orders page in Zenventory.