![Untitled design (24)-1.png]](https://help.zenventory.com/hs-fs/hubfs/Logos/Untitled%20design%20(24)-1.png?width=60&height=60&name=Untitled%20design%20(24)-1.png)
When processing a customer order, the first step is to allocate stock. This will identify and reserve specific items from your inventory to use for fulfillment of a particular order. This step can be automated by enabling Auto Allocation in Zenventory (see System Settings and more info on how Auto Allocation works), or it can be handled manually by a user for greater control.
Even if the Auto Allocation setting is enabled, there are situations when manual allocation might be needed, such as in the case of backorders. If an order is created or imported into Zenventory containing items that are out of stock, the order will be held by the system, waiting for user input to allocate needed items as they return to stock.
NEW FEATURE V3.124 - Priority Reallocation - take allocated/picked stock and reallocate it to other orders.
Allocating stock for a customer order manually
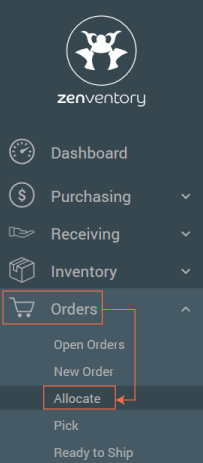
- Navigate to the "Orders" tab and select "Allocate" from the sub-menu.
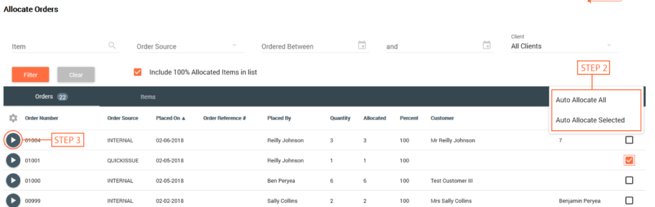
- Select "Orders" tab to review orders waiting for stock allocation. You may click "Auto Allocate All" or "Auto Allocate Selected" from the Actions menu if Auto Allocate is not turned on to have the system automatically allocate stock for all waiting orders from stock on hand, wherever sufficient stock is available. "Auto Allocate All" will attempt to auto-allocate all orders on this page, regardless of any filter that has been applied.
- Alternately to the Auto Allocate All and Auto Allocated Selected Orders options mentioned above, you also have the ability to use those same actions from the Items view on the Orders > Allocate Page.

- Note: You can set up Auto Allocation for all customer orders if you go to the Admin > System >Basic Settings menu for your orders to allocate automatically.
- Alternately to the Auto Allocate All and Auto Allocated Selected Orders options mentioned above, you also have the ability to use those same actions from the Items view on the Orders > Allocate Page.
- To manually allocate for a particular order, click the "Allocate Items for this Order" button to the left of an order.
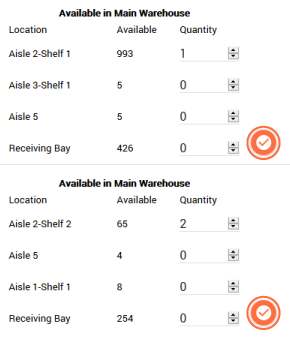
- If you have selected to manually allocate the order review the available inventory in your warehouse and then click the Checkmark button to allocate the location of each item in your order in the Warehouse. NOTE: If there is more than one sub-location where this item is stored within the warehouse, you'll be asked to enter the quantity you would like to allocate from each location.