Use a Scanner with Zenventory Web Interface
Utilizing a scanner with Zenventory can help to make certain tasks more efficient. A scanner can be used to Receive goods, conduct Cycle Counts, or Pick items for Customer Orders. This article will detail when a scanner can be used and it's functionality in the respective process. Scanners must have the ability to read barcodes and/or QR codes.
Using a Scanner Connected to a PC
Global Rule - anyplace in the interface where an item search field is present, you can use your scanner to scan that item's barcode to pull up the item and its SKU.
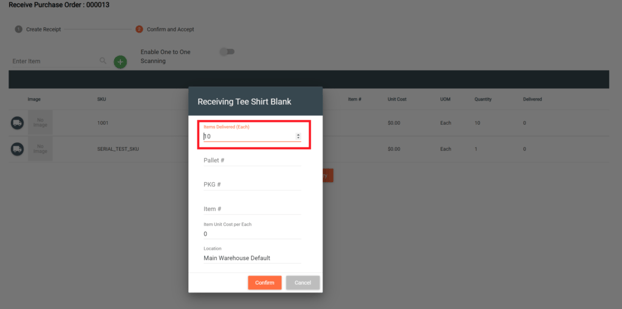
- Receiving
- NOTE: On the SKU receiving screen, your mouse cursor will need to be in the "Enter Item" search field for the scanner to work properly.

- One to One Scanning Enabled (see above screenshot) - Will recognize the SKU number and increment the received count for that SKU by +1 each time the barcode is scanned.
- One to One Scanning Disabled - Will pull up the scanned SKU's receiving modal where the received count can be entered by keyboard.
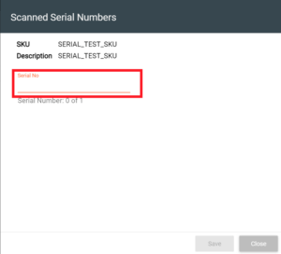
- Serial Number Entry - upon receiving a serialized item quantity and hitting the orange confirm button in the above screenshot, a serial number entry modal will pop up. On this screen you can scan the item's serial #'s one by one. Once enough serial numbers have been scanned to equal the number of items being received, the "save" button will turn from grey to orange and those serials can now be saved into inventory.
- NOTE: On the SKU receiving screen, your mouse cursor will need to be in the "Enter Item" search field for the scanner to work properly.
- Picking items for Customer Orders
- NOTE: To enable one-to-one pick scanning, do so from the system settings by navigating to Admin > System. On the SKU Picking screen, your mouse cursor will need to be in the "Scan/Enter Item" search field for the scanner to work properly.
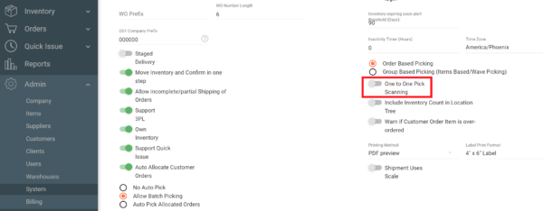
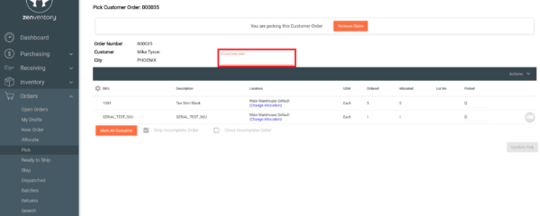
- One to One Pick Scanning Enabled - Will recognize the SKU number and increment the received count for that SKU by +1 each time the barcode is scanned.
- One to One Pick Scanning Enabled - Will pull up the Pick Quantity modal where you can enter in the amount of items you have picked.
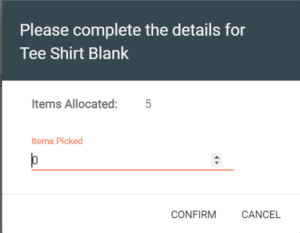
- Picking of Serial Numbered items is handled the exact same as way as already outlined in the receiving process.
- NOTE: To enable one-to-one pick scanning, do so from the system settings by navigating to Admin > System. On the SKU Picking screen, your mouse cursor will need to be in the "Scan/Enter Item" search field for the scanner to work properly.
- Conducting Cycle Counts
- NOTE: All cycle count scanning within the web interface will use one-to-one scan to increment the count by +1 for each scan made of a SKU. In order for scanning to work properly, the mouse cursor needs to be in the "Scan Barcode" field. See screenshot below.
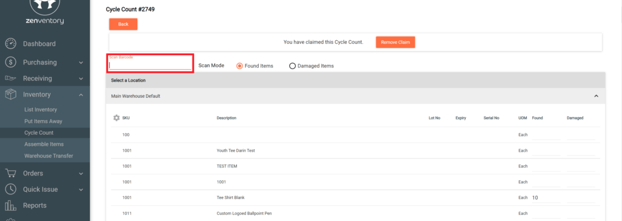
- Scan the barcode of an item and the count on that item will increment by +1. Do this for all of your items and then hit approve location when completed with your scans/counts.
- Scanning a warehouse location barcode will take you directly to that location on the Cycle Count page. This is a useful tool when many warehouse locations are present on a cycle count.
- NOTE: All cycle count scanning within the web interface will use one-to-one scan to increment the count by +1 for each scan made of a SKU. In order for scanning to work properly, the mouse cursor needs to be in the "Scan Barcode" field. See screenshot below.
![Untitled design (24)-1.png]](https://help.zenventory.com/hs-fs/hubfs/Logos/Untitled%20design%20(24)-1.png?width=60&height=60&name=Untitled%20design%20(24)-1.png)