![Untitled design (24)-1.png]](https://help.zenventory.com/hs-fs/hubfs/Logos/Untitled%20design%20(24)-1.png?width=60&height=60&name=Untitled%20design%20(24)-1.png)
Shipstation Integration Update (03/13/2024): Shipstation has made a change with regard to the timeframe that the API KEY and API SECRET values you obtain in steps #4-#7 below are valid for. You now have the option of choosing a 3, 6, or 12 month timeframe that they will work for. You should always choose 12 month. What that means is that once per year, you will receive an email from Shipstation saying your current API KEY and SECRET values will be expiring. You'll need to generate new ones, and then plug those in to your Shipstation integration setting in Zenventory on the Admin>System>Integrations>Shipping page.
Shipstation Integration Update (08/23/2023): The assigned fulfillment warehouse ID can now be passed to ShipStation when orders are sent for shipment. Manual action Map Warehouses added to Actions menu for ShipStation integration.
This requires special setup & alignment of the location/warehouse names between the systems. Contact our Support Team for assistance with configuration.
ShipStation Integration Functionality:
- Pushes "Ready to Ship" orders from Zenventory into ShipStation
- Pushes a "shipped" status update for ShipStation orders that are manually marked as Complete, Shipped, or Dropshipped in Zenventory
- Pulls updated shipment information from ShipStation into Zenventory (tracking number, carrier info)
- Pulls new orders from ShipStation with "Awaiting Shipment" status into Zenventory if not already present - **Optional**
- Adds a tag of your choice to ShipStation orders that are fully picked in Zenventory - **Optional**
- Pushes a "cancelled" status update for orders marked as cancelled in Zenventory - **Optional**
Update interval (maximum):
- 15 minutes
Configuring the integration:
There are two places where you will need to enter information to set up this integration: From the ShipStation UI and from the Zenventory UI. It will be helpful to have both sites open during this process.
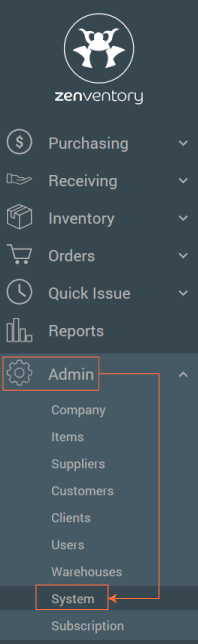
- Start by logging into Zenventory, navigate to the "Admin" tab and select "System".
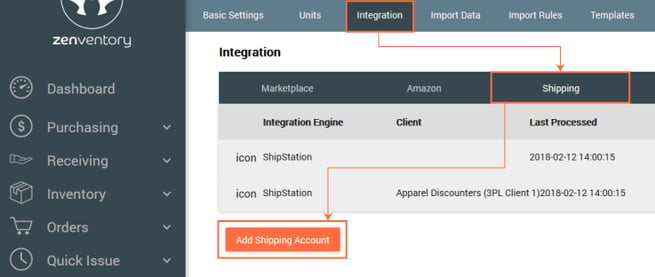
- Select Integration, click the Shipping" Tab , and select "Add Shipping Account".
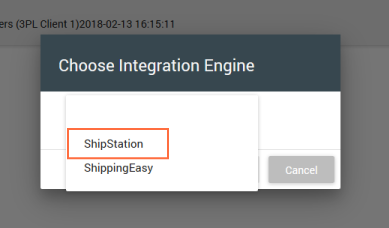
- Choose ShipStation from the dropdown menu. Click "Add" to create the new integration.
- Log into ShipStation to get your API Credentials.
Navigate to Account Settings -> Account -> API Settings. Select V1 API from the "Select API Version" dropdown menu and hit the "Generate" button.
- Select 12 months and hit Generate.

- Copy/Record both the API Key and API Secret values. Hit Done.

- Paste (Ctrl+V) the API Key and API Secret to the matching fields in Zenventory.
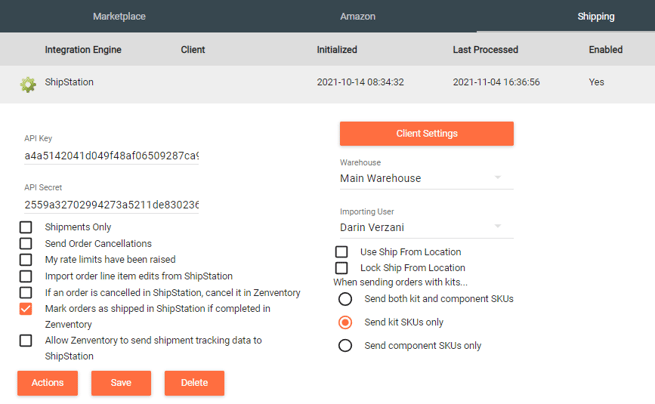
- Some final settings to review in Zenventory before finishing your integration:
- Importing User (required) - This is the user account that will be logged as the one accountable for any actions happening related to the ShipStation integration (orders being created or completed, etc.). The user account must have a SecureKey. You can use any existing Admin user account or create a new one if desired.
- Warehouse (optional) - This will determine the default warehouse used for allocation of orders coming from ShipStation. If nothing is entered, system defaults will be used.
- Manual action for "Map Warehouses" has been added to Actions menu for ShipStation integration. See below.
-
NOTE: When adding a new warehouse on the Zenventory side have to run this action first for orders to properly be set for that warehouse Ship From.
-
.png?width=344&height=239&name=Screenshot%20(130).png)
- Use 'Ship From' Location
- If checked, Zenventory will try to allocate stock first from the 'Ship From' warehouse name specified by ShipStation for the order. ** Only recommended to enable this if your 'Ship From' warehouse names in ShipStation will exactly match your warehouse names in Zenventory. If there is a mismatch, or if the named warehouse doesn't exist yet in Zenventory, it will be created automatically when the order downloads.
- (DEFAULT) If unchecked, Zenventory will ignore the ShipStation-specified 'Ship From' warehouse name and follow the default behavior for choosing what warehouse to use.
- If an order is cancelled in Shipstation, cancel it in Zenventory
- With this setting enabled, any order that gets canceled inside of Shipstation, will also cancel the order in Zenventory by unpicking, unallocating items, and then cancel the order.
- Lock 'Ship From' Location
- With this setting enabled, the originally specified 'Ship From' warehouse designated by ShipStation for a particular order will be used to determine allocation, even if that variable is later changed inside ShipStation.
- If unchecked, Zenventory will be allowed to receive any updates to the 'Ship From' location from ShipStation and to use the new warehouse for allocating stock, assuming the order items have not already been fully allocated.
- Shipments Only
- If checked, Zenventory will simply post orders to ShipStation for shipping when they are ready, and will not attempt to download new orders from ShipStation. Check this box only if all your marketplaces are connected directly to Zenventory rather than ShipStation.
- If unchecked, Zenventory can both send orders to and receive orders from ShipStation. Leave unchecked if your marketplaces are connected to ShipStation rather than Zenventory. (Default setting)
- My rate limits have been raised
- If you are a high-volume user who has been specifically granted a higher API rate limit by ShipStation, you can now enter your Partner Key when setting up the integration to allow our system to take advantage of the increased limit and improve sync performance.
- Import order line item edits from ShipStation
- If an order is modified in ShipStation and line items are changed (quantity changes, new SKUs added, old SKUs removed, etc.), the order will be reprocessed in Zenventory and the new line items will be imported. Note: Line items already marked as shipped in Zenventory cannot be modified.
- Mark orders as shipped in ShipStation if completed in Zenventory
- If the order has been fulfilled and shipped fully through Zenventory, then this will update the order as shipped in ShipStation.
-
- Zenventory will send any shipment data, tracking numbers, etc. to ShipStation.
Client Settings (3PLs) - If you're a third party fulfillment company that stores inventory for others, you will need to assign a Client or Clients and associate specific stores to tell Zenventory which of your clients' inventory & stores this integration should look at.- As of 7.14.21, this is all done with one ShipStation integration, instead of having to set up one integration for each Client. Follow these steps.
- Click on the orange "Client Settings"
 button to pull up the Client Settings pop up.
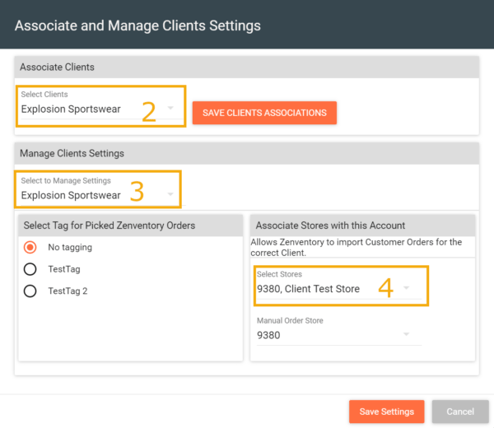
- Under the "Select Clients" dropdown menu you will select each client you wish to have a ShipStation integration with. Select all that apply.
- To associate the stores to the specific client, select the client you would like to manage settings for using the "Select to Manage Settings" pulldown menu.
- Associate the stores for this client using the "Select Stores" pulldown menu.
- Tagging: Zenventory can tag orders in Shipstation that are "Ready to Ship". You can select those tags you have created here.
- When finished doing this for all clients, click the orange "Save Settings"
 button.
- Click on the orange "Client Settings"
- As of 7.14.21, this is all done with one ShipStation integration, instead of having to set up one integration for each Client. Follow these steps.
How to test and confirm functionality after integrating:
- Create a test order in any ShipStation-connected marketplace. See if it downloads successfully to ShipStation. Timing for this is dependent on the integration. If it doesn't download at all, there is an issue to troubleshoot in the integration between your connected marketplace and Shipstation.
- See if the order in ShipStation downloads to Zenventory. It should pull in every 15 minutes automatically. If it doesn't, confirm that the "Store" in ShipStation where the order originated is mapped to the correct ShipStation integration in Zenventory (if you have more than one), using the Store Selector in the integration settings.
- Create a test order in Zenventory. See if it uploads successfully to ShipStation (every 15 minutes). The order will be posted into ShipStation's "Manual Store" and should be able to be shipped.
- Make sure both test orders are in the "Ready to Ship" status in Zenventory, and then ship them in ShipStation. The orders should move to Dispatched status in Zenventory automatically and have tracking numbers applied (every 15 minutes).
Reasons an order might be skipped for import
- The order was in a status other than "Awaiting Shipment" when our system looked for it. Our system only pulls in orders that are in the "Awaiting Shipment" status, so if it was "On Hold" or any other status, that would prevent it from downloading.
- The order was lacking some piece of information that is required in order to import to our system. Occasionally, we come across orders in ShipStation that for some reason don't have a name or Ship-To address, which would present a problem for our importer.
- The order was shipped too quickly for us to pick it up (example: an order that was shipped within minutes of being downloaded into ShipStation). Zenventory checks for new orders at a 15 minute interval, so if it was shipped more quickly than that, there's a chance that the order moved out of the required "Awaiting Shipment" status before we could catch it.