![Untitled design (24)-1.png]](https://help.zenventory.com/hs-fs/hubfs/Logos/Untitled%20design%20(24)-1.png?width=60&height=60&name=Untitled%20design%20(24)-1.png)
Each carrier account that you can connect to Zenventory for in-app shipping has optional account settings that can be enabled if you wish. This article details what those settings are, and how to enable them.
Accessing Carrier Account Settings Pages
1. Go to Admin>System>Shipping>Shipping Engines page.
2. Click the 3 bullet point icon on the left of "ShippingEngine".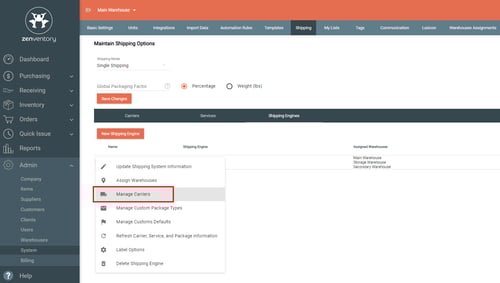
3. Select "Manage Carriers" to pull up the list of connected carriers.
4. Click the gear cogwheel icon to access the carrier account settings you wish to access. 
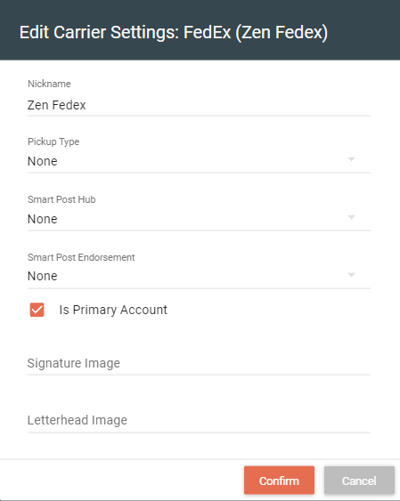
FedEx Account Settings:
Available options are shown in the below screen. Just select from the dropdown menus or input in any other desired information. To enable Smart Post services, make sure to select both a Hub and Endorsement type.
UPS Account Settings:
Use the checkboxes to mark which settings you would like to enable. More information below on Using consolidation services such as Mail Innovations and Enabling Negotiated Rates.
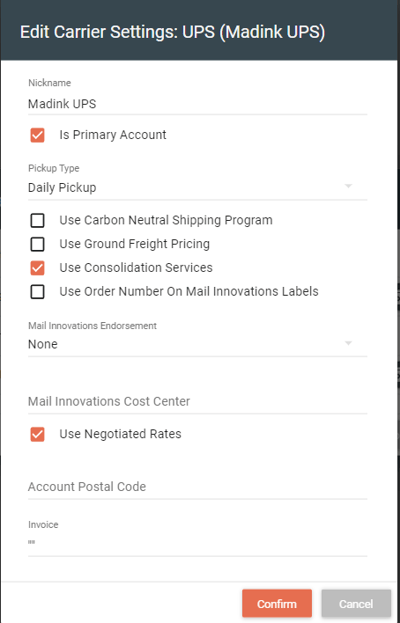
- In order to use Mail Innovations or to enable Negotiated Rates, you must have the "Use Consolidation Services" checkbox enabled.
- Mail Innovations
- Choose your main innovations endorsement type from the "Mail Innovations Endorsement" dropdown menu.
- Input your Mail Innovations Cost Center. This information can be gathered from within your ups.com online account information or by contacting the UPS Customer Service team.
- Enable your account's Negotiated Rates to be used in Zenventory
- Enable teh "Use Negotiated Rates" checkbox.
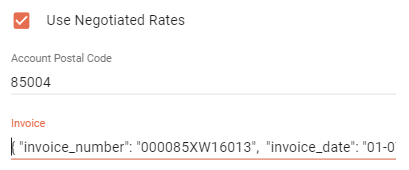
- Enter the Postal Code on file with your account. This might be different than the billing address on your invoices. Go to the Addresses section of your ups.com account to gather the correct address.
- In order to fill in the invoice section, you will need to gather the following information from a recent invoice in your UPS account.
- Invoice Number, Invoice Control ID, Invoice Date, and Invoice Amount.
- Copy and paste the following text into the "Invoice" field, replacing the below values with those from your invoice:
-
{ "invoice_number": "000085XW16013","invoice_date": "01-07-2023","invoice_amount": "1180.25","control_id": "91T4" }