Attach files to Customer Orders and Purchase Orders
Zenventory has the capability to attach files to Customer Orders (CO) or Purchase Orders (PO) during creation or during editing. This is especially useful for 3PL's who do FBA order fulfillment as Amazon provides the shipping labels for these orders.
Supported File Types: 7z, .doc, .docx, .gif, .gz, .jpeg, .jpg, .ods, .odt, .pdf, .png, .rtf, .tar, .txt, .wpd, .wpf, .xls, .xml, .zip, .csv, .xlsx
Maximum File Size: 30MB
Attach file to a Customer Order or Purchase Order:
- A file can be attached to a Customer Order during the creation of the order or upon editing of an existing open order.
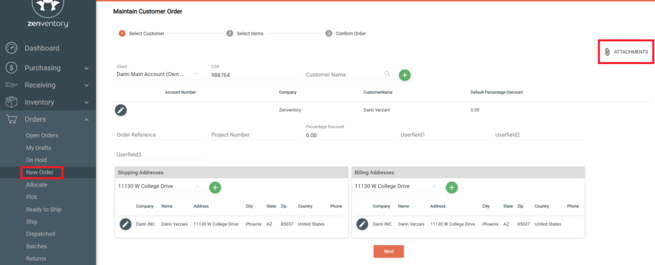
- Create a customer order by going to Orders>New Order or a purchase order by going to Purchasing>New Purchase Order.
- Click the "Attachments" icon to upload files to the order.

- Select the file from the location you have it saved on your device.
- To upload another file, click "Upload."
- When done uploading all files, click "Close."

- Finish creating the CO or PO as normal.
- The file (s) are now attached to that CO/PO created. You can tell when a CO or PO has a file attached because the "Alert" column will have a paperclip icon displayed.

Attach, Edit, Delete, Download/Print file(s) on an existing PO or CO:
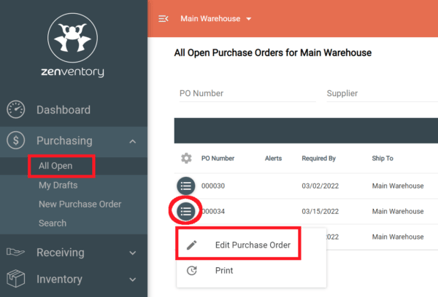
- Either from the Orders>Open Orders page for CO's or the Purchasing>All Open page for PO's, click the 3 line icon to the left of the Order number and select "Edit".

- NOTE: If a file is already attached to the order, you can just click the paperclip icon to add more files, delete existing attached files, or download/print existing attached files.

- Click the "Attachments" icon.
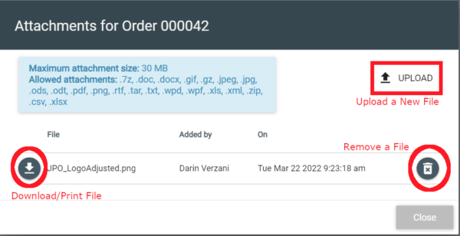
- From here you can add more files, download existing files, or delete existing files.
- Add a file - click "upload" and select the file from your device.
- Delete a file - click the X icon to the right of the file.
- Download a file - click the download icon to the left of the filename to download or print the file.

- Once done making edits to the order, click "Finalize" for CO's or "Confirm" for PO's.
![Untitled design (24)-1.png]](https://help.zenventory.com/hs-fs/hubfs/Logos/Untitled%20design%20(24)-1.png?width=60&height=60&name=Untitled%20design%20(24)-1.png)